“Only a fool ignores the advice of a brilliant man. Oy an idiot denies the good practice of an enemy.”
Unknown Voice Recording
Fragments of the Remembrancer Core
The Armies
For this mission, all Commanders should compose an Engagement Force from their Battle Company’s Regimental Registry, adding any additional Conscripts to their armies from the list of approved Horus Heresy publications provided by the Event Organizer (EO). The total points cost of the Engagement Force is 2,000 points.
Commanders may either decide between themselves or should roll off to see which side will be the “Defenders” and which side will be the “Attackers”.
The Battlefield
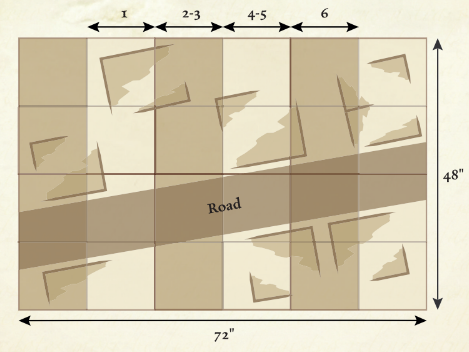
Terrain will be set up to mimic the packed city streets of a Mechanicum minining settlement on a 48” by 72” gaming board. The following are some guidances to help fill the narrative of building a shattered settlement:
- Place the tallest buildings towards the center of the Battlefield to break up lines of sight and encourage both sides to navigate the Ruins to achieve their objectives.
- Ruins and Buildings should be separated by 2” to mimic claustrophobic alleyways, 8” to mimic local roads, or 12” to represent major causeways.
- Excavation equipment and crates are encouraged to be placed in clusters with nearby road or causeway connection.
Commanders should ensure that there is a clear area at least 8” in width (used to represent the Primary Road, see below) placed across the longest dimension of the board or running between diagonally opposite sections of the board edge.
Deployment
The Attacker must roll a D6 and then must place a temporary marker anywhere on the Primary Road section that mass through the board sector corresponding to the number rolled. The Defender must then deploy their Warlord, Archeotechno Magos (see the Critical Evacuee Special Rule), and any Unit which they have joined within 16” of the marker and at least 16” from a Board Edge.
The Defender may then deploy the rest of their Engagement Force within 16” of this primary Unit as per normal (Note: Infiltrators may be deployed outside of this radius if desired as per their special rules). Any models elected to not or cannot be deployed in this manner which are not part of a Subterranean, Deep Strike, or Outflank Assault are instead placed in Reserves. The marker is then removed from the board.
The attacker may then deploy their army anywhere on the board that is at least 24” away from any enemy model, with no more than half the Unit’s models NOT in Line of Sight of a Defending Unit, and NOT on the Primary Roadway. Any Units that cannot be deployed in this way should be placed in Reserves.
The short edges are the Defending Commander’s Board Edge, while the long edges are the Attacking Commander’s Board Edge (representing the Defender’s reinforcements arriving from along the road route and the Attackers arriving through the industrial wastelands). All models will Fall Back towards the controlling player’s closest board edge.
Special Rules
Reserves, Night Fighting, Critical Evacuee, Imperial Roadways, Haze of Industry
Critical Evacuee
Commanders should locate a model to represent a resident Archeotechno Magos (a standard poker chip may be used if no model exists). The model uses the basic profile of a Magos Auxilia from Liber Mechanicum (Page 28). The Defender may expend up to 100 points from their own Army’s total to upgrade this model as per its profile.
Each time the Unit which this Magos is attached to suffers a Wound via Shooting, the Magos must make a Leadership Test, modified by -1 for each Wound suffered. Should the Leadership Test fail, the Magos will break away from the Unit and begin fleeing. The model will move through the shortest path possible to the nearest Defender board edge, diverting slightly to end each movement within Cover if the Defender desires. If the path of the Magos would cause it to move within 3” of a friendly Unit, the Magos may make another Leadership Test. Should it succeed, the Magos then immediately joins that Unit and rallies. Otherwise, they continue to flee.
If the Magos reaches base contact with the Defender’s Board Edge, they are removed as a Casualty.
Imperial Roadways
For as long as human civilization has existed, roadways have acted as the veins and arteries of its cities, ferrying vital supplies and populations in times of peace, and munitions and soldiers in times of war.
Areas defined as Roads count as open ground. Additionally, when moving only through areas defined as Roads, all models, including Vehicles but excluding those Embarking or Disembarking from a Transport, may add an additional +2” to their distance moved during the Movement Phase. This additional movement has no effect on their ability to Run, Move Flat Out, Declare Charges, or modify a Charge result.
Haze of Industry
The cataclysmic destruction of a planetoid designated for harvest by the Mechanicum of Mars creates a hostile environment for those engaged in combat within it. From clouds of choking dust to chunks of ferrocrete tumbling from ruins, there are deadly threats beyond the guns of the enemy to account for.
At the beginning of the game, roll a D6 to determine the effects of this special rule. The individual effect indicated by the result of the roll applies for the duration of the game. Should both Commanders agree to it, this result may be re-rolled, ignoring duplicates.
| D6 Result | Description |
|---|---|
| 1 - 2 | Obscuring Smoke – All models gain Shrouded (6+). If they already have the Shrouded (X) special rule, this is improved by 1 to a maximum of 4+. |
| 3 - 4 | Billowing Dust Cloud – Line of sight is reduced to a maximum of 18”. Note that line of sight may still be drawn from a model equipped with a nuncio-vox when firing a weapon with the Barrage special rule. |
| 5 - 6 | Scouring Winds – Models of the Infantry type suffer a penalty of -1 Toughness when in areas of open ground, to a minimum Toughness characteristic of 1. This reduction DOES NOT affect the Instant Death threshold. |
First Turn
The Attacker has first turn, unless the Defender can Seize the Initiative.
Game Length
After five turns, roll a D6. On a 4+, a sixth and final turn is played.
Victory Conditions
This mission showcases the Attackers staging an ambush on the Defenders as they try to escort a resident Magos of the residual archaeological activities to “safety”.
Primary Objectives
If the Archeotechno Magos is removed from the board as a Casualty by direct attacks, the Attacker is awarded 3 Victory Points. If they are instead removed from the board as a Casualty from fleeing at the Board Edge, the Attacker is awarded 1 Victory Point (see below Fruits of Victory).
For every time the Archeotechno Magos rallies, the Defender is awarded 1 Victory Point.
If, at the end of the game, the Archeotechno Magos has not been removed as a casualty, the Defender automatically wins, regardless of the number of Victory points scored by either side.
Secondary Objectives
First Blood, Last Man Standing, Attrition, Slay the Warlord
Fruits of Victory
Should the Archeotechno Magos survive the mission, the Defender should speak to the EO. If the Archeotechno Magos is removed from the board via fleeing at the Board Edge, the Attacker should speak to the EO.
Mission Debriefs: After you finish playing the above mission, ensure that one of the Commanders logs it in our system via the following Google form: https://forms.gle/gFNQJEq2UKnNqBV58.