“It wasn’t the largest hab on Manachea, but its promethium transit nodes made it key to the entire Ullan Plateau. They say that the night Kessanir Spire fell, it was transformed into a funeral pyre and the fires of its death could be seen from orbit.”
Master Sgt Gregario
933rd Solar Auxilia Cohort (The King-Makers)
The Armies
For this mission, all Commanders should compose an Engagement Force from their Battle Company’s Regimental Registry, adding any additional Conscripts to their armies from the list of approved Horus Heresy publications provided by the Event Organizer (EO). The total points cost of the Engagement Force should not exceed 1,7500 Points.
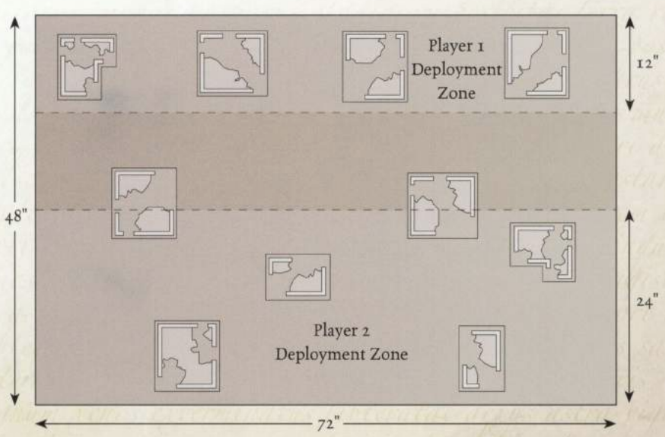
The Battlefield
Terrain will be set up to mimic the packed city streets of a colonial settlement on a 48” by 72” gaming board. The following are some guidances to help fill the narrative of building a shattered settlement:
- Place the tallest buildings towards the center of the Battlefield to break up lines of sight and encourage both sides to navigate the Ruins to achieve their objectives.
- Ruins and Buildings should be separated by 2” to mimic claustrophobic alleyways or 12” to represent local roadways.
- Add scatter terrain to the buildings and roadways to fill in the spaces and represent the belongings of former denizens strewn about.
The Commanders then take it in turns (determined by mutual agreement or by a roll off) identifying a total of D3+1 Ruins or Buildings (which may not be Commander-controlled fortifications) anywhere on the table. These are the key buildings which both sides are attempting to control in the Engagement, and as each is identified, the Commander that does so chooses one of the building types from the following list:
- City Defense Armoury: What remains of this structure is littered with ammunition cases, power packs and feed lines, allowing troops within to maintain a prodigious rate of fire without consideration of expending their own supplies.
- A Unit occupying this Structure re-rolls To Hit rolls of 1 in the Controlling Player’s Shooting Phase.
- Promethium Storage Deposit: The shattered rockcrete of this ruin is threaded with exposed promethium conduits fed from bulk storage tanks sunk in the ground below. By bleeding off controlled amounts of fuel, troops can overcharge the pressure on certain weapons, if they are willing to risk the perils of doing so.
- Any Flamer weapon fired by a non-vehicle model occupying this Structure in the Controlling Player’s Shooting Phase can change its weapon type from Assault or Pistol to Heavy. If it does so, the weapon gains the Torrent special rule until the end of that Phase.
- Vault of Strife: Within the ruin are scattered numerous artefacts of the Age of Strife, locked away with the coming of Imperial Truth, but now released by the passing of war. They include the writings of madmen and despots, accounts of their horrific deeds and relics of their awful crimes.
- All Units occupying this Structure may elect to cause Fear (2), but suffer -2 to their Leadership.
- Medicae Facility: Though devastated like so much of the city, this medicae facility still contains sufficient automated chirugenic machines and apothecarion supplies to tend to the most grievously injured who can reach sanctuary there.
- All Units occupying this Structure gain Feel No Pain (6+) Special Rule, gaining a +1 bonus to it if they already have the rule (to a maximum of 3+).
- Generatorum: The ruin is host to what remains of a power generator facility and some of its sub-systems remain functional. Shunting power from these feeds into the intake of an energy weapon is hazardous, but when the situation dictates, some warriors will take that risk.
- Las, Melta, and Plasma weapons may add +1 to their Strength characteristic when fired by a Unit occupying this Structure. However, if this bonus is used, they gain the Gets Hot (3+) Special Rule, increasing to Gets Hot (4+) if the weapon already has this Special Rule.
- Vox Relay Node: The smashed pict-slates and hissing vox-grilles adorning the interior of this structure mark it as the remains of a communications hub. Those warriors with the training to do so can patch what remains of this network and use it to coordinate the deployment of allies.
- A player with a Unit occupying this Structure may re-roll Reserves, Outflank, and Deep Strike dice results. If this benefit is used, they must re-roll the entire dice pool (EX: both distance dice and the scatter dice for a Deep Strike Assault).
Deployment (Deadly Ground)
To Determine deployment order, the Commanders roll off. The winner may choose to deploy within the “Safe Ground” or the “Deadly Ground”.
The Commander which has declared themselves as holding the “Safe Ground” deploys normally within 12” from a chosen long board edge. The same Commander may now re-position up to D3 Ruins anywhere on the table not in their own Deployment Zone, so long as there remains at least one Ruin within their Deployment Zone.
The opposing Commander’s Deployment Zone (the “Deadly Ground”) is the area up to 24” on from the opposite long table edge.
Special Rules
Reserves, Night Fighting, Weak Superstructures
Weak Superstructures:
The constant bombardments of the planet have caused instabilities within the settlement’s superstructures, leading to many of their entrenched buildings to become excessively unstable. At the beginning of each Game Turn, roll a D6 for each Building Ruin within the “Dangerous Ground” Zone. On the result of a 5+, the Building suffers a Structural Collapse, increasing (IE: made worse) its Cover Save by 1 and all models wholly within the Building’s footprint suffer a Strength (5 + X), AP - Wound, where X is the number of times said Building has suffered a Structural Collapse (IE: if a Building has had this effect twice, said models suffer a Strength 7 AP - Wound).
First Turn
The Raider may decide to take the first turn or go second; their opponent, the Defender, may attempt to Seize the Initiative.
Game Length
After five turns, roll a D6. On a 4+, a sixth and final turn is played.
Victory Conditions
The “A Fortress Besieged” mission represents the two opposing sides of the Heresy attempting to gain control of the settlement’s once crowning jewel or defending their foothold within the gateway to the Nebula. At the end of the game, the Commander who has scored the most Victory Points has won the engagement. If the Commanders have the same number of Victory Points, the game ends in a draw.
Primary Objectives
- Asset Secured: At the end of the game, each occupied target building earns the controlling Commander 2 Victory Points.
Secondary Objectives
- Structurally Sound: Each occupied Building Ruin within the “Safe Ground” Zone grants the controlling Commander 1 Victory Point.
- Living Dangerously: Each occupied Building Ruin within the “Dangerous Ground” Zone grants the controlling Commander 1 Victory Point for each time it suffers a Structural Collapse while the same Unit(s) occupy it.
Tertiary Objectives
Slay the Warlord, Attrition, Price of Failure
Fruits of Victory
The Victorious Player may select any Units occupying a Target Building for Marked for Greatness in addition to the normal one allowed by the Bitter Conquest Campaign rules.
Mission Debriefs: After you finish playing the above mission, ensure that one of the Commanders logs it in our system via the following Google form: https://forms.gle/gFNQJEq2UKnNqBV58.